So You Wanna Grow Ginger?
Most folks think ginger just magically appears in little grocery store bins, wrinkled, beige fingers tossed in a crate like forgotten treasure. But growing it yourself? That’s a whole different story.
It’s like finding out your grandma’s old armchair has a secret drawer filled with gold coins. Underneath that humble skin, ginger is quietly magical,and believe it or not, ridiculously satisfying to grow at home.
Whether you’re an old-school gardener with calloused hands or someone who’s just now realizing your basil plant didn’t die on accident, ginger’s a slow but generous friend.
Give it a corner of your garden or a spot by the kitchen window, and with just a little patience, it’ll pay you back in spicy-sweet abundance.
Let’s get into how you can grow it, properly and harvest more than just a handful of shriveled nubs.


Ginger 101: What You’re Actually Growing
Here’s a fun twist: what we call ginger “root” isn’t really a root at all. It’s a rhizome, an underground stem that grows horizontally.
That’s why it looks like a sprawling alien hand instead of a tidy little taproot. It grows sideways, sending up shoots and down roots as it goes.
Kind of like it’s taking over quietly, one inch at a time.
The most common type you’ll plant is Zingiber officinale, the culinary variety we slice up for tea or toss into stir fry.
There’s also ornamental ginger, pretty, sure, but useless in the kitchen.
Galangal, turmeric, and other rhizome cousins look similar but need slightly different care.
For now, let’s stick with the good stuff: the kind that smells like spicy earth and bites back a little when you chew it raw.
Finding the Right Ginger to Plant


You’d think grabbing a piece from the supermarket would be fine, and sometimes, it is. But commercial ginger is often treated with a growth inhibitor to stop it from sprouting on shelves.
Not ideal if you’re hoping for a jungle in your backyard.
Here’s what to look for:
Firm, plump rhizomes
They should feel heavy for their size, with taut skin and no give when you press lightly.
Avoid anything that feels squishy, shriveled, or looks like it’s had a rough week in the fridge drawer.
A good piece will look alive, almost as if it’s ready to burst into growth, not collapse under its own sadness.
Visible “eyes”
Little nubs or nodes, kind of like what you’d see on a sprouting potato. These are the spots where new shoots will emerge, and they’re absolutely essential if you want the plant to grow.
Think of them as the ginger’s version of a launch pad, no eyes, no green shoots, no harvest.
Sometimes they’re subtle, barely raised; other times they’re already sprouting little green points. Either way, that’s where the magic begins.
No mold, rot, or shriveling
This one’s non-negotiable. If your ginger smells sour, feels slimy, or has any fuzzy patches (white, green, or black), toss it.
Mold and rot mean the internal tissues are breaking down, and you won’t get a healthy plant from something already halfway to compost.
Shriveling is usually a sign it’s dried out too much or is just old stock, think of it like trying to revive a forgotten raisin back into a grape.
You need fresh, vibrant rhizomes to stand a real chance.
If you can snag some organic ginger, even better. Health food stores, Asian markets, or local farmers often have better quality pieces.
If your ginger doesn’t sprout after two weeks sitting on a sunny windowsill, toss it and try again. Life’s too short to wait on a dud.
Want a head start? Soak the ginger in warm water overnight, then place it in a shallow tray with a damp paper towel.
Keep it warm and humid. Within 7–14 days, those little eyes will start to swell and turn green. That’s your cue, it’s go time.
When (and Where) to Plant for a Happy Ginger Plant
Ginger’s picky about one thing: warmth. It won’t even think about growing until temps stay above 70°F (21°C) day and night.
In cooler climates, that means planting indoors around March or April and transplanting after the last frost.
In tropical zones, plant any time and brag to your colder-climate friends.
Outdoor planting? Make sure:
Soil temp is consistently warm
Not just a fluke on a sunny afternoon, but reliably toasty, especially in the top 6 inches where the ginger will sit.
We’re talking steady temps above 70°F (21°C), day and night. If you’re unsure, grab a soil thermometer; they’re cheap and surprisingly helpful.
Cold soil will make ginger sulk and sit still, while warm soil gives it that gentle nudge to start sprouting and expanding underground like it’s meant to.
There’s partial shade
Ginger hates harsh midday sun, and honestly, it acts a bit dramatic about it. If you’ve ever seen leaves go limp or scorched in direct sun, you know the vibe.
This plant prefers dappled light or morning sun with afternoon shade. Think of where ferns or hostas might grow, ginger likes similar conditions.
If you’re growing in a pot, move it during peak sun hours or place it behind taller plants that can act as a natural light filter.
You’ve got rich, loose, well-drained soil
The kind that crumbles easily in your hands and smells faintly earthy, like a forest floor after rain. Ginger absolutely hates compacted or sticky clay soil.
It wants room to stretch sideways and breathe. If your soil feels heavy, work in some coarse sand, aged compost, and a little perlite or rice hulls.
You’re aiming for a mix that holds moisture but drains excess water fast enough that it never puddles.
Think moist cake, not brownie batter, and definitely not concrete.
Growing in containers?


Perfect. Ginger loves containers, especially wide, shallow ones (12–18 inches deep, 15–24 inches across). Fabric grow bags are great too.
Keep it near a sunny window or outside on a shady porch once it warms up.
Prepping Your Soil Like a Pro
Imagine lying down in a pile of crumbly chocolate cake, that’s how ginger wants to live. It needs soil that holds moisture but doesn’t drown it.
Here’s the mix:
- 1 part loamy soil
- 1 part compost or well-rotted manure
- 1 part coconut coir or peat moss for moisture retention
- A handful of perlite or sand for drainage
- Optional: worm castings or a splash of banana peel tea to boost potassium
Aim for a soil pH between 5.5 and 6.5. Not sure? Pick up a cheap soil test kit from your local garden center. Ginger’s chill, but if the soil’s way off, it just won’t grow.
Planting Day: Let’s Get Dirty
Here’s where the fun begins.
What you’ll need:
- Pre-sprouted ginger pieces
- Garden trowel or hand shovel
- Mulch (straw, wood chips, or shredded leaves)
- Watering can or hose with a gentle spray
Steps:
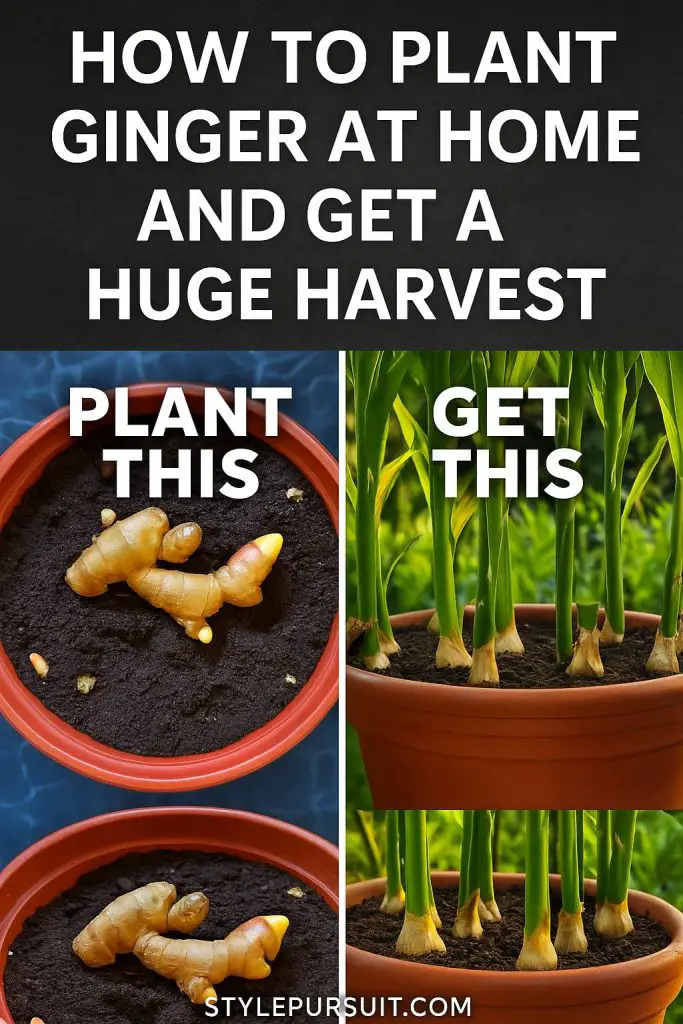
- Break ginger into 1–2-inch pieces, each with at least one eye.
- Dig holes 2–4 inches deep, spacing pieces 6–8 inches apart.
- Place the pieces horizontally, eyes facing up.
- Cover lightly with soil, don’t bury it like treasure.
- Water well and cover with a 2-inch layer of mulch to hold in moisture.
You might not see anything for weeks. That’s okay. Ginger’s a slow starter but a strong finisher.
The Slow Burn: Ginger’s Growth Timeline
Ginger isn’t one of those fast, flashy plants. It won’t sprout the day after you plant it. But once it starts, it gets serious.
Months 1–2: Not much above ground. Underground, roots are forming and tiny shoots are prepping to emerge.
Months 3–4: You’ll start to see leafy stems. They’re lush and tropical-looking, makes a nice houseplant, honestly.
Months 5–6: This is where it bulks up. Rhizomes expand fast during warm, humid months.
Months 7–9: Harvest time (if you want baby ginger) or leave it longer for mature roots. It’ll start to yellow and wilt, that’s a good sign, not a failure.
You can even sneak a piece off early without disturbing the whole plant. Just dig gently with your fingers near the edge and snip off a chunk. The rest will keep growing.
Ginger Care 101: Don’t Smother, Don’t Starve
Ginger likes moist soil, not soggy. Overwater and you risk rot. Underwater and it’ll stall.
Watering Tips:
- Water deeply when the top inch feels dry.
- Reduce watering as harvest time nears and leaves turn yellow.
- Don’t let it sit in puddles. Ever.
Feeding Tips:
- Use a liquid fish emulsion or compost tea every 3–4 weeks.
- Sprinkle in a slow-release organic fertilizer mid-season.
- Add a bit more mulch every month to feed the soil and keep it cool.
Pests? Rare, but watch for aphids, spider mites, or root mealybugs. Neem oil spray does the trick. Mold? That usually means too much water or poor air flow. Fix that, and it usually clears up.
Signs It’s Ready to Harvest
You’ll know it’s go-time when the leaves turn yellow and the stems start to fall over. That’s the plant telling you, “I’m done, thanks for everything.”
Harvesting Tools:
- Garden fork or hands (gentle fingers work best)
- Soft brush for cleaning dirt
- Clean knife or pruners
Loosen the soil and gently pull up the entire plant. Shake off loose dirt and trim the stems. You’ll be holding a beautiful cluster of ginger in your hands, fragrant, earthy, alive.
Cure it by drying in a warm, shaded place for 3–5 days. This toughens up the skin for longer storage.
Post-Harvest: What Now?
Fresh ginger stores best in the fridge (wrapped in a paper towel inside a zip-top bag) or in the freezer for longer stretches.
You can also dry slices for tea, candy it, or pickle it.
But here’s a tip: save the fattest, healthiest pieces with good eyes for next season. Let them rest in a cool, dry place until you’re ready to plant again.
This is how you build a never-ending ginger supply.
Common Mistakes That Mess It All Up
Everyone screws up at least once. Here are the big ones:
- Planting unsprouted ginger – you’ll wait forever
- Too much sun – it scorches the leaves
- Overwatering – root rot is real and merciless
- Starting too early in cold weather – it’ll just sit and sulk
Don’t be too hard on yourself. Even pros lose a few rhizomes now and then.
Bonus: Growing Ginger Indoors Year-Round
If you’ve got a sunny windowsill or a grow light, you can grow ginger inside. Seriously.
- Use a wide, shallow container
- Keep humidity up (mist it or use a humidity tray)
- Give it warmth at least 70°F
- Rotate the pot every few days so it doesn’t lean
It’ll grow slower indoors, but it’s a conversation starter and a cozy little winter project.
A Few Natural Digressions (Because We’re All Thinking It)
You start growing ginger, and suddenly, you’re steeping ginger tea with honey, grating it into every stir fry, and making those tiny ginger shots that cost $4 at juice bars.
It hits different when it’s your ginger.
You’ll offer pieces to neighbors, surprise your in-laws, even hand some to the mailman if he mentions liking tea. It’s the kind of plant that keeps on giving—and makes you feel, quietly, like you’ve figured something out.
Kids love seeing where it grows, too. “Wait, it’s underground?!” It’s like magic beans, but real.
Grow It Once, You’ll Never Go Back
Growing ginger at home isn’t just about saving money or getting better flavor (though those are solid reasons).
It’s about slowing down. Tending something simple and ancient. Watching green shoots rise and knowing, without needing proof, you’re doing it right.
So grab a piece of ginger, find a warm spot, and plant the thing. You’ve got this.
And next time someone scoffs at your garden ambitions, you can hand them a spicy, fragrant root and say, “Yeah, I grew that.”