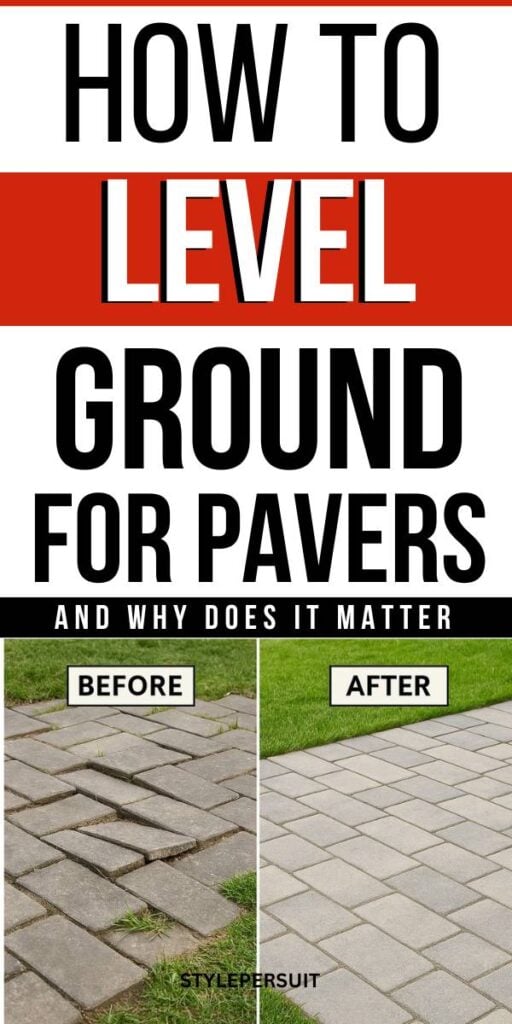
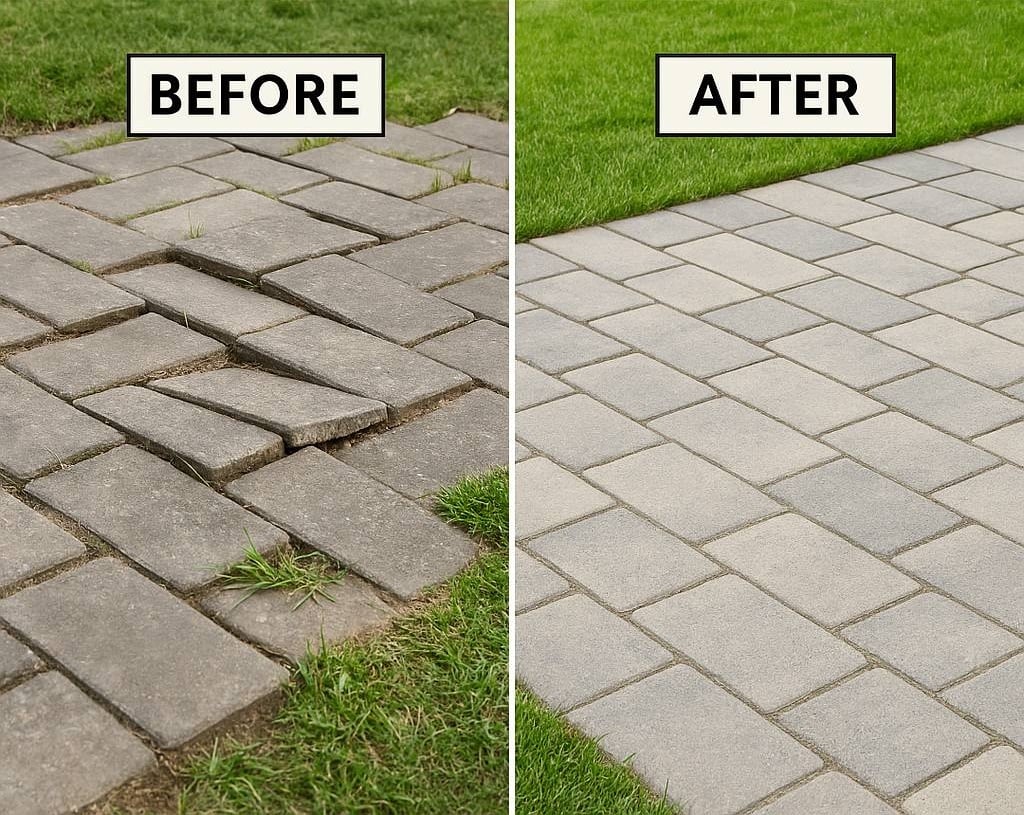
There’s something deeply satisfying about a patio or walkway made of pavers, clean lines, solid footing, and a look that instantly upgrades your yard.
But before you ever place the first stone, there’s one part of the process that decides how long your hard work will last: leveling the ground.
Most people underestimate it.
They start eager, skip a few steps, and end up with a patio that shifts, dips, or puddles after the first heavy rain.
And fixing it later? That’s twice the work. So, the best thing you can do for your future self is to take a little extra time now.
Think of it like building a house. You wouldn’t lay down the roof before pouring a solid foundation, right?
The same idea applies here, if the ground beneath your pavers isn’t even, compact, and properly drained, every other step becomes a temporary solution.
Leveling ground isn’t just about getting things “flat.”
It’s about shaping the earth so it stays stable, drains well, and supports whatever weight it needs to, whether that’s a few lawn chairs or your car tires.
And here’s something most DIY guides skip: this isn’t only about tools and measurements.
It’s also about patience. You’ll be tempted to rush, especially once the sun gets hot and the shovel feels heavier than it should.
But slowing down at this stage is what separates a weekend project from a professional-looking finish.
So, before you get started, take a deep breath, grab a notepad, and visualize how you want your space to look, flat where it should be, sloped where it needs to drain, and firm enough that you could walk on it barefoot years from now without feeling a single wobble.
Tools and Materials You’ll Need (The Smart Way to Prepare)
A smooth project starts with being properly stocked, not realizing halfway through that you forgot the compactor or ran out of gravel.
Here’s the list that makes this job go from chaotic to calm.
Tools You’ll Actually Use:
- Shovel and spade: You’ll need both. The shovel handles bulk dirt, the spade does the shaping and trench edges.
- Rake: For spreading soil, sand, and gravel evenly.
- Tape measure & string line: Helps you define straight edges and consistent levels.
- Level (2 or 4 feet long): Keeps everything balanced as you go.
- Tamper or plate compactor: Crucial for firming up your base, no skipping this.
- Wheelbarrow: Saves you from carrying heavy loads back and forth.
- Gloves and safety glasses: You’ll be grateful for these when gravel starts flying.
Materials You’ll Need:
- Crushed stone or gravel: This forms the backbone of your base. It should be coarse, angular gravel, not round stones that shift over time.
- Coarse sand (concrete or bedding sand): Creates the smooth top layer that cradles your pavers evenly.
- Landscape fabric (optional): Keeps weeds and soil from mixing into your gravel layer.
- Edge restraints: These plastic or metal strips keep your pavers from spreading outward.
- Pavers: Whether concrete, clay, or natural stone, choose durable ones designed for outdoor use.
Amazon Product Recommendations:
- Heavy-Duty Garden Shovel Set
- Manual Tamper Tool for Soil and Gravel
- Landscape Fabric Roll (Weed Barrier)
- Concrete Sand for Bedding
You know what separates a calm, steady weekend project from one that drives you nuts? Preparation.
If your tools are laid out, your materials are ready, and your layout is planned before you start digging, the whole process feels ten times easier.
Mark and Clear the Area (Where the Real Work Begins)

Now that you’ve got your tools lined up, it’s time to define the space you’re working with. Don’t eyeball it.
Take ten extra minutes to mark things precisely, your future self will thank you when your edges line up perfectly and the patio looks intentional instead of “almost straight.”
Start by outlining your area using string lines and wooden stakes.
- Measure your desired length and width.
- Drive a stake into each corner.
- Run the string tightly between the stakes to create a perfect rectangle or shape you want.
- Double-check your diagonals. If both diagonal measurements are equal, your corners are square.
If your area isn’t rectangular (say, you’re building a curved path or patio), you can spray paint the outline using marking paint.
Just walk the perimeter and trace it naturally. This step is more forgiving, but make sure you can still visualize your slope (we’ll get to that soon).
Once marked, clear the surface completely. Grass, weeds, roots, rocks, and debris — everything must go.
If you’re removing turf, a flat spade or manual sod cutter can make the job faster and cleaner.
Roots are a little trickier; use a mattock or hand saw to cut them out. Don’t ignore them, even small ones.
They’ll rot later and create soft spots that make pavers sink unevenly.
If your soil is clay-heavy or damp, now’s a good time to leave it open for a few hours of sun. Dry soil is easier to work with and compacts better.
And if you’re feeling tired already, that’s normal, the first day of any landscaping project always feels heavier than it looks.
Just remind yourself that this stage sets the tone for everything else. Think of it like setting up the frame before painting a masterpiece.
Amazon Product Recommendations:
Excavation and Setting Your Grade (The Most Underrated Step)
Once your area is cleared and outlined, the digging begins. This step determines how stable, even, and long-lasting your pavers will be.
The goal isn’t just to dig down but to create a consistent depth and slope for drainage.
It’s a little like sculpting, you’re shaping the land to perform well under pressure.
Here’s how to calculate your excavation depth:
- Start with your paver thickness (usually 2–3 inches).
- Add 1 inch of sand bedding.
- Add 4–6 inches of gravel base for patios or 6–10 inches for driveways.
- Your total excavation depth = paver + sand + gravel.
For example, if you’re using 2.5-inch pavers, 1 inch of sand, and 5 inches of gravel, you’ll dig about 8.5 inches deep.
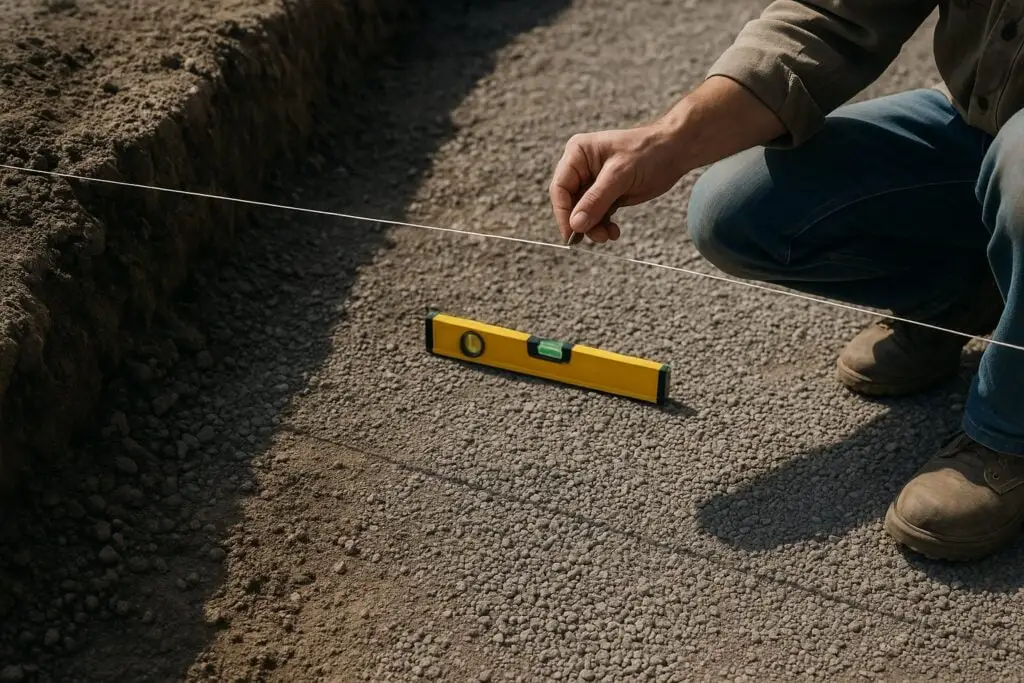
While you’re digging, it’s essential to maintain a consistent slope, about 1 inch drop every 8 feet away from your house or any structure.
This prevents rainwater from pooling near walls or foundations. A string line and level are your best friends here.
You can attach a small line level to your string, then measure how much drop you need by lowering the far end slightly.
As you remove soil, toss it into a wheelbarrow and store it nearby. You might need some of it later for backfilling or landscaping edges.
When you reach the desired depth, compact the soil using your tamper or plate compactor.
This step isn’t optional, compacted soil ensures your gravel base doesn’t shift under weight or rain.
If your soil is sandy and loose, consider laying landscape fabric before adding gravel. It prevents the gravel from sinking into the soil over time.
If your soil is clay, you might need to rough it up a bit before adding gravel so the layers grip each other better.
When you’re done, stand back and look at the space, it should resemble a clean, slightly sloped bowl, not a pit.
The edges should be level with each other according to your string lines.
Amazon Product Recommendations:
Building the Base: Gravel, Sand, and Compaction

This is the step that separates a long-lasting patio from one that looks great for three months and then slowly turns into a wavy puzzle.
The base is the muscle beneath your pavers, it takes the load, handles movement, and keeps everything steady.
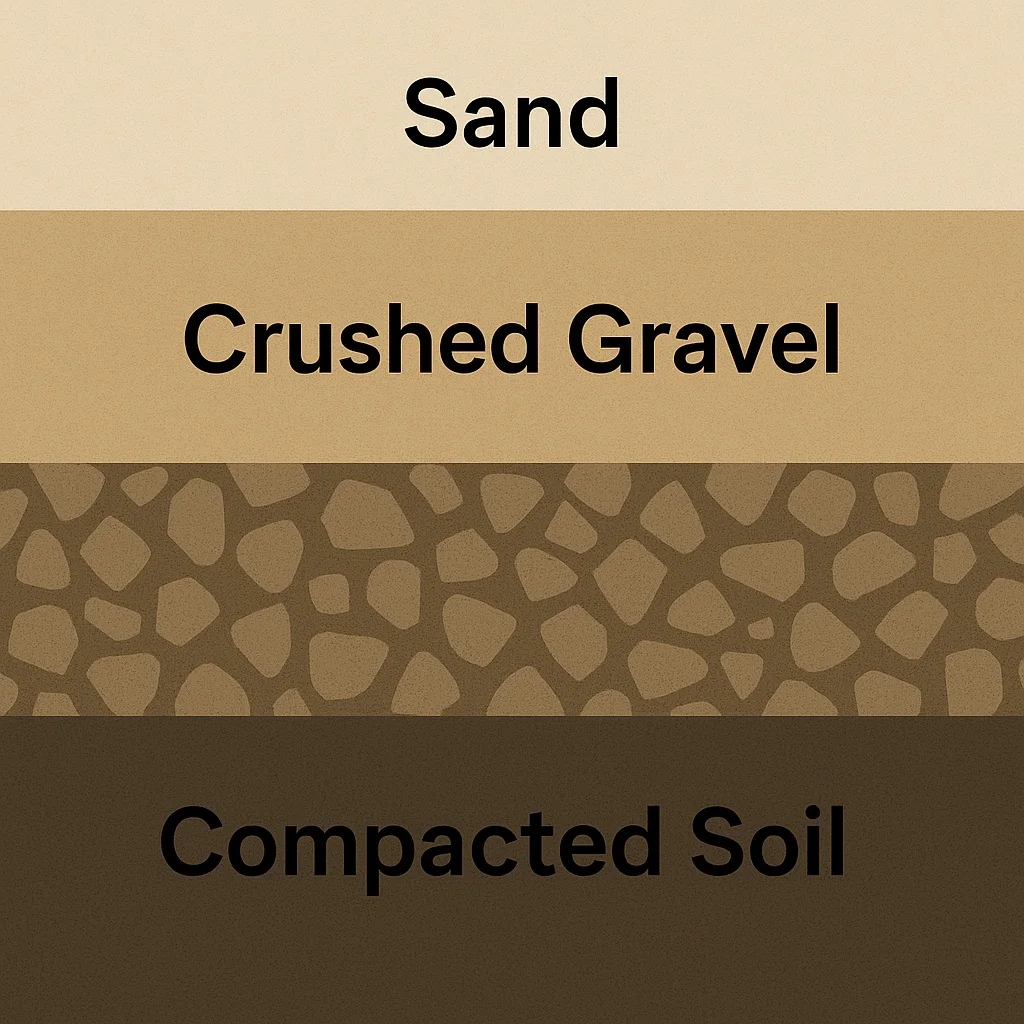
You’ll be layering three main materials here: gravel (the structural layer), sand (the leveling bed), and, of course, your pavers.
Start by adding your crushed gravel or stone base. Don’t use round river rock or pea gravel, they roll around like marbles under pressure.
You want something angular, like ¾-inch crushed stone, because it locks together tightly when compacted.
Step-by-Step for Building the Base:
- Spread your first layer of gravel about 2–3 inches deep.
- Compact it thoroughly using a tamper or plate compactor. If you skip this part or do it lightly, the ground will settle unevenly over time.
- Add another 2–3 inch layer and compact again. It’s better to do multiple thin layers than one thick one. Compaction works best in stages.
- Once you’ve reached your total base depth (usually 4–6 inches for patios, 6–10 for driveways), give it one last firm compaction until it feels rock solid underfoot.
You’ll know it’s right when your footprints barely show on the surface. If your soil was soft or clay-heavy, and you laid down landscape fabric first, this step locks everything in place beautifully.
Now comes the sand layer, this creates a smooth, cushiony surface that helps each paver sit flush.
- Spread about 1 inch of coarse sand evenly across the compacted base.
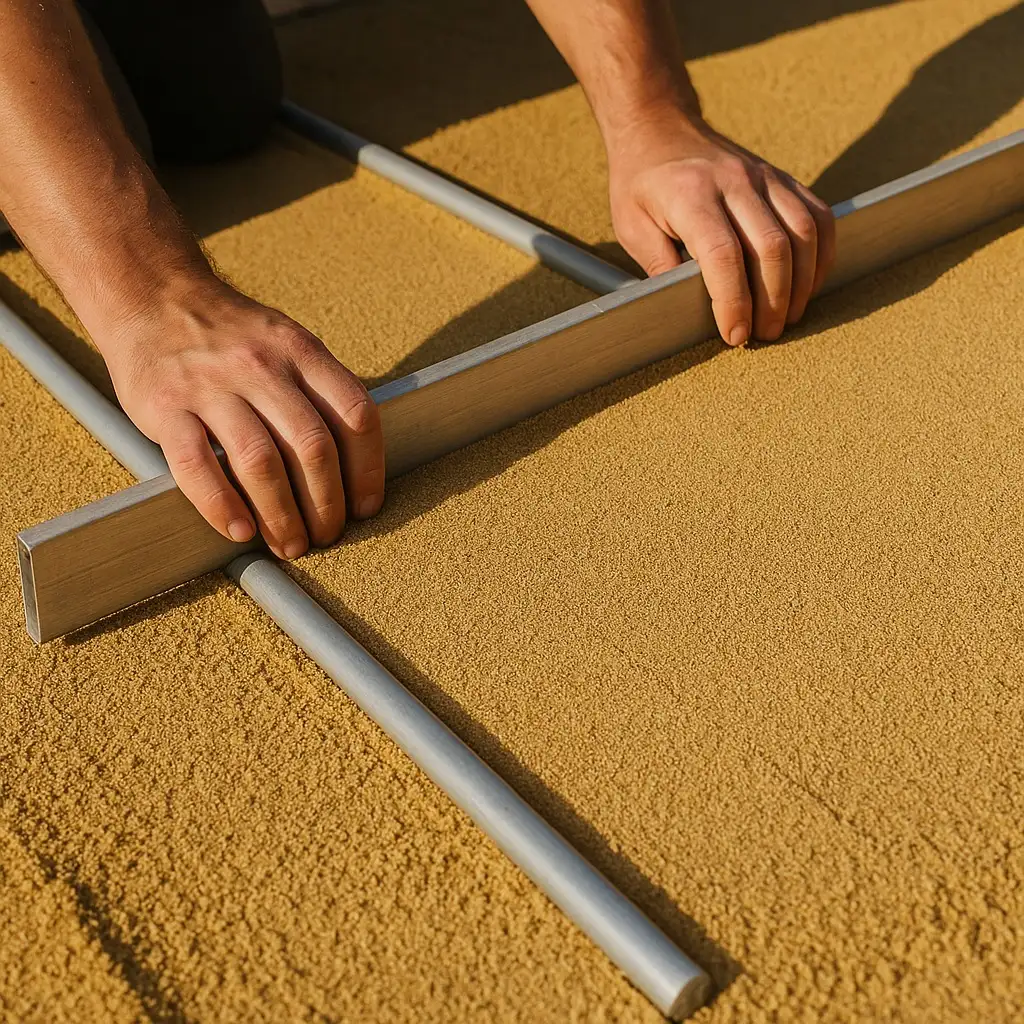
- Use two parallel pipes (like 1-inch PVC) as guides and drag a straight board or 2×4 across them to screed the sand perfectly level.
- Gently remove the pipes afterward and fill their tracks with sand.
Don’t compact this layer yet, that happens after the pavers are set. Right now, just keep it smooth, even, and undisturbed.
Avoid walking on it as much as possible; every footprint can throw off your level.
Amazon Product Recommendations:
- Crushed Stone Gravel for Base Layer
- Manual Plate Compactor
- 1-Inch PVC Pipes for Screeding
- Straight Board Screed Tool
Drainage and Slope: Keeping Water Where It Belongs

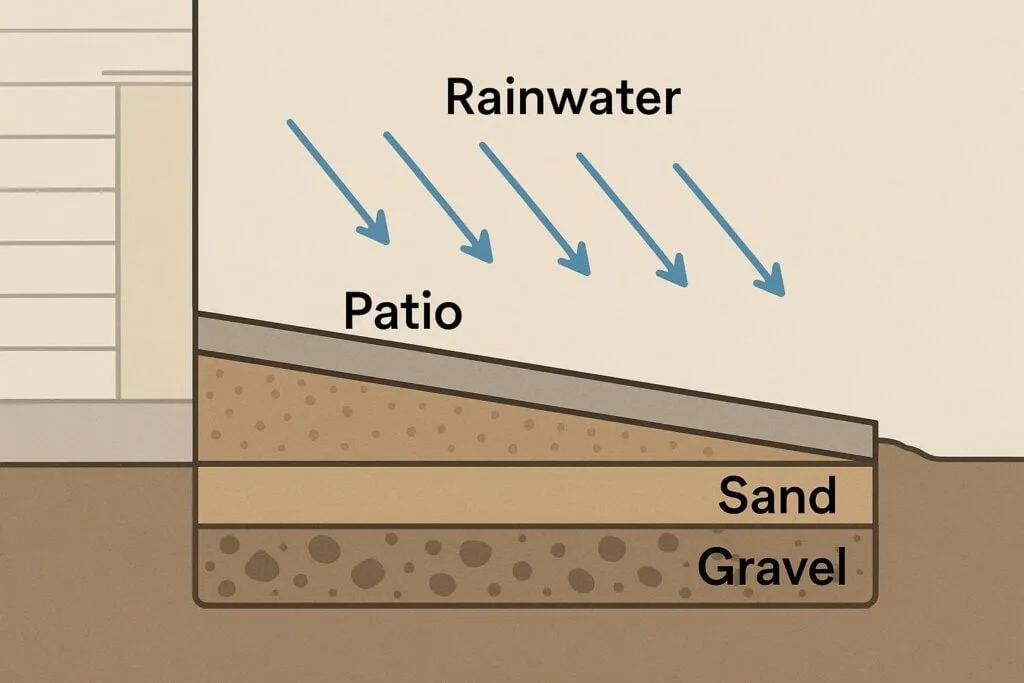
A perfectly flat patio might look appealing, but water has its own agenda. If it can’t flow away, it’ll sit, soak, and eventually cause shifting or moss growth between your pavers.
This is why you always want a gentle slope, not enough to notice while walking, but enough for rain to run off naturally.
The general rule: a ¼ inch drop per foot away from your house or any structure. That’s about 1 inch of slope for every 4 feet of patio. It’s subtle, but it makes all the difference.
How to Get the Right Slope:
- Keep your string line tight between stakes on both sides of the area.
- Use your level to lower one end slightly until it shows a ¼-inch drop per foot.
- That’s your target slope, now match the ground underneath to that line.
- As you build up your gravel base, keep checking the slope. It’s easier to adjust as you go than after you’ve laid all your pavers.
Don’t be afraid to check this multiple times. Even professionals measure and remeasure because drainage mistakes are sneaky, the surface might look fine, but one small dip can trap water.
Pro Tip: If your yard is prone to flooding or sits in a low area, consider installing a French drain or drainage pipe underneath the base before you start laying pavers.
It redirects excess water safely away without affecting the patio surface.
When everything slopes evenly and feels compact, stand back and look at it from a distance. It should look flat to the eye, but your level should confirm that subtle angle.
This is the invisible detail that keeps your patio looking new for years.
Amazon Product Recommendations:
Screeding, Tamp Prep, and Final Setup Before Laying Pavers

You’ve done the heavy lifting, now it’s time for the precision work. Think of this stage as polishing the surface before you apply the final coat of paint.
Everything you do here directly affects how flat and aligned your pavers will look.
Start by giving your compacted gravel one last inspection. If you spot dips or humps, correct them before moving forward. This is your base, you can’t “fix” it later with sand or pavers.
Now, spread your bedding sand again if it shifted or got disturbed during drainage setup. Aim for about an inch in thickness, no more, no less. You’re not building a cushion, you’re creating an even support bed.
Grab two 1-inch pipes (PVC works perfectly) and lay them parallel across your work area. These will act as your screed rails.
Then, pour sand between them and drag a straight 2×4 board or aluminum screed over the top in a gentle back-and-forth motion. The goal is a silky-smooth surface — no ridges, dips, or footprints.
When done, carefully lift out the pipes, fill the small trenches they leave, and smooth them over with a trowel.
And here’s the golden rule: don’t walk on it. Even one step can throw off the level, and that small footprint will haunt you later when you start laying the stones.
Before you bring in the pavers, make sure your edge restraints are installed. These hold everything together and prevent your layout from shifting.
You can use plastic edging secured with metal spikes or concrete edging if you want a more permanent frame.
Make sure it sits snugly against the sand bed and follows the slope you established earlier.
If you’re using a pattern (like herringbone or basket weave), mark a straight reference line on the sand using your string line.
That first row determines how every other paver lines up, get it right, and your patio looks like it was laid by a pro.
And if you’re wondering when to compact again, that comes after the pavers are set in place, not now. Compacting before would ruin your carefully leveled sand.
Amazon Product Recommendations:
- PVC Screed Rails – 1 Inch Diameter
- Aluminum Leveling Screed Board
- Plastic Edge Restraint Kit with Spikes
Bonus Tips, Quick Fixes, and Common Hiccups
No matter how carefully you plan, outdoor projects like this always find a way to test your patience.
So let’s go through a few real-world hiccups you might encounter — and how to handle them without wanting to throw your shovel across the yard.
Problem 1: Uneven Spots After Screeding
You might notice certain areas slightly higher or lower than the rest. Don’t panic. Just remove a bit of sand with your trowel, re-screed that section, and check again.
For deeper dips, add a little more sand and drag your straightedge gently over it until smooth.
Problem 2: Rain Before You Lay the Pavers
If you wake up and find your sand bed soggy, resist the urge to keep going. Wet sand compacts unevenly. Let it dry completely, if it clumps or feels muddy, you’ll need to loosen and re-screed it before continuing.
Problem 3: Large Roots or Rocks Below Surface
Sometimes, even after excavation, stubborn roots or buried stones make the base unstable.
Dig out that section, refill with gravel, compact again, and restore your slope. It’s tedious but worth it.
Problem 4: The Slope Looks Off
If water looks like it might flow toward your house instead of away, pause. Pull your string lines back up, remeasure, and reset your level.
You can correct small grade mistakes by adjusting the sand bed, no need to redo everything.
Problem 5: Edges Shifting While You Work
Edge restraints can shift slightly when you’re spreading sand near them. Just reposition and spike them again before laying pavers. Once the pavers are down and compacted, everything will lock tightly in place.
Pro Advice: Don’t skip double-checking your slope and level right before laying. Every extra minute of prep saves an hour of repair later. The difference between a weekend DIY and a “contractor finish” comes down to details like these.
Amazon Product Recommendations:
- Trowel and Leveling Kit
- Manual Tamper for Recompact Small Areas
- Edge Restraint Spikes – Heavy Duty Steel
Maintenance, Troubleshooting, and Keeping Your Pavers Perfect
You’ve done the hard part, your pavers are down, leveled, and looking sharp. But here’s the reality: no matter how perfect your installation, the ground beneath your home always shifts a little over time.
That doesn’t mean your patio will collapse, but it does mean light maintenance goes a long way.
Let’s break it down into what you should expect (and how to fix it).
1. Slight Shifting or Low Spots
After heavy rain or a freeze-thaw cycle, a few pavers might dip slightly. Don’t ignore them, water can collect there and cause erosion.
Lift the affected pavers with a flat screwdriver or pry bar, add a bit of sand underneath, re-level, and set them back in place. Give it a gentle tamp to lock everything again.
2. Weeds Between Pavers
No matter how careful you were with your base or fabric, nature finds a way. Use polymeric sand or jointing sand to fill the gaps between pavers and harden the joints.
Once it sets (with a light mist of water), weeds have a much harder time sneaking through.
A handheld flame weeder can also help remove tiny weeds without harsh chemicals.
3. Puddles After Rain
If water pools in certain areas, it means the slope isn’t quite right. You don’t have to tear up the whole surface, just focus on the problem zone.
Lift the affected pavers, adjust the sand base below (add or remove a little), and re-lay them following the slope.
4. Wobbly Edges
Loose edges are a classic sign of missing or shifted restraints. Reinstall the edging, spike it securely, and compact around the perimeter again.
Edge support keeps your layout locked tight through temperature changes and foot traffic.
5. Discoloration or Stains
Outdoor surfaces get messy, leaves, mud, barbecue grease, you name it. A simple solution is to scrub stains using a mild detergent and stiff brush.
Avoid power washing at full blast; it can erode the joint sand and weaken your structure.
To keep your pavers looking new, consider sealing them once every 2–3 years. It enhances color and adds a layer of protection against dirt, weeds, and UV fading.
Amazon Product Recommendations:
- Polymeric Joint Sand for Pavers
- Paver Sealant – Wet Look Finish
- Stiff Bristle Outdoor Scrub Brush
- Handheld Flame Weeder
Final Thoughts and Handy Gear You’ll Thank Yourself For
Here’s the truth — leveling ground for pavers isn’t glamorous, but it’s one of the most satisfying home projects you’ll ever do.
You start with uneven dirt and end up with a surface that looks intentional, strong, and ready to host a summer evening barbecue.
There’s something rewarding about it too. The process slows you down, makes you notice details — how soil packs, how water moves, how precision pays off. It’s one of those projects where a little patience equals years of peace of mind.
A solid base is invisible, but it’s what keeps everything above it beautiful.
If you’ve followed every step — from excavation and slope to screeding and compaction — you’ve essentially built a structure beneath your feet. That’s not just DIY, that’s craftsmanship.
And because good tools make all the difference, here’s a small list of equipment worth investing in for future projects (they’ll pay off long-term)
When you’re finally sitting on that new patio, maybe with a cup of coffee or a cold drink, you’ll glance at those pavers and think, Yeah, I did that.
That quiet pride — that’s why this project is worth every shovel of dirt.