
There’s something about hydrangeas that feels nostalgic, isn’t there? Like warm afternoons in your grandmother’s garden.
Or walking past a neighbor’s fence and pausing just to admire the way those blue and pink blooms cluster like scoops of sorbet.
They’re bold and gentle at the same time, effortless but somehow still fussy.
And for many of us, they’ve become a quiet obsession.
But here’s the thing.
Hydrangeas don’t always cooperate. One year, they explode with blooms. The next, nothing but leafy drama. You try the sun, you try the shade.
You water. You cross your fingers. And then someone on the internet says, “Just use baking soda.”
Wait, baking soda?
That same white powder you throw into cookies or toss into your fridge to keep smells at bay?
Yep. That one.
It’s become one of those viral gardening tricks that has folks grabbing an old Arm & Hammer box and heading straight to the flower bed. Some say it makes hydrangeas bloom like crazy.
Others swear it wipes out fungus without harsh sprays. And then some say, Don’t do it, you’ll mess up your soil.

So what’s the truth?
Is baking soda actually good for hydrangeas? Or is it one of those “sounds smart, doesn’t work” Pinterest hacks?
That’s exactly what we’re sorting out here.
This guide isn’t about throwing tips at the wall and hoping something sticks. We’re going to break down what baking soda can realistically do for your hydrangeas, and what it can’t.
And no, this isn’t just for gardeners with big, curated backyards. Whether you’ve got a single sad pot on your balcony or an entire flower bed that refuses to bloom, there’s something here for you.
Is Baking Soda Good for Hydrangeas? Let’s Get Real


So, is baking soda a miracle fix for hydrangeas? Not exactly. But it’s not total fluff either.
Let me explain.
Baking soda (sodium bicarbonate) isn’t a fertilizer. It doesn’t add nutrients to the soil or feed your plant.
But it can slightly raise the pH level of your soil, which matters, especially when you’re working with pH-sensitive plants like hydrangeas.
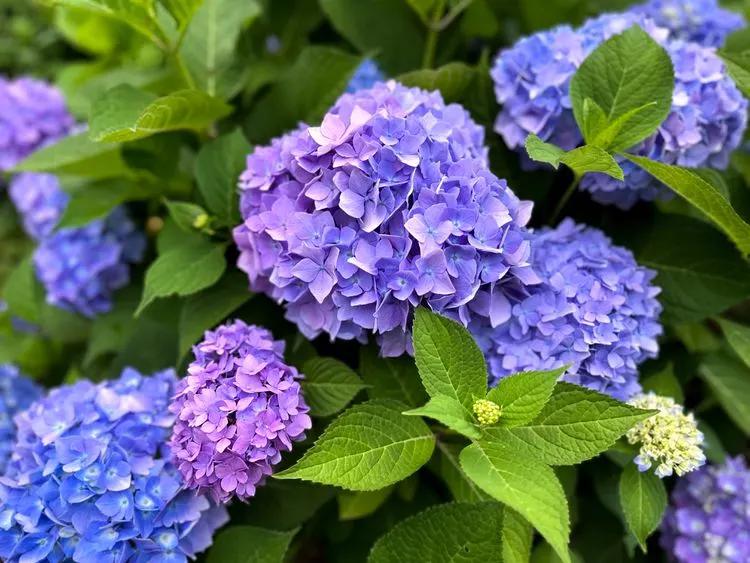
Here’s the weird-but-true part: Hydrangeas are one of the few flowers that change color based on soil pH.
Acidic soil (low pH)? You’ll get blue blooms. Alkaline soil (higher pH)? They turn pink.
So yes, in a roundabout way, baking soda can influence the color of your flowers, just not always in a straight line.
But more importantly, baking soda has mild antifungal properties. That’s the real reason gardeners have been sprinkling it around for generations.
If your hydrangeas are struggling with powdery mildew, black spot, or general funk, a diluted baking soda spray might help clear things up.
Still, moderation is everything here. Too much baking soda can shift the pH too far and throw your whole soil ecosystem off balance.
That’s especially risky if you’re growing other acid-loving plants nearby (like azaleas or blueberries).
So to answer the question:
Is baking soda good for hydrangeas?
- Yes, when used sparingly and purposefully
- No, if you’re hoping it’ll magically make them bloom or solve unrelated issues
It’s like salt in a recipe, helpful in the right dose, but too much and suddenly you’re trying to rescue dinner with a loaf of bread and a prayer.
Quick Recap:
- ✔️ Might help reduce fungal problems on leaves
- ✔️ Can raise soil pH slightly, nudging blooms from blue to pink
- ❌ Not a fertilizer
- ❌ Won’t solve poor lighting, over-pruning, or root issues
How to Use Baking Soda for Hydrangeas Without Harming Them

You know how a splash of lemon juice can brighten a soup, but too much makes it inedible? Baking soda and hydrangeas work the same way.
A little goes a long way, and the trick is knowing where, when, and why you’re using it.
Let’s break it down by use case.
For Treating Fungal Disease (Not a Myth)
If your hydrangea leaves are starting to look blotchy or powdery, that’s likely mildew or black spot creeping in.
Baking soda can help slow it down.
Here’s a simple recipe gardeners swear by:
- 1 tablespoon baking soda
- 1 tablespoon vegetable oil (or mild horticultural oil)
- A few drops of dish soap
- 1 gallon of water
Mix it all and pour into a spray bottle. Spray it lightly onto the leaves (top and bottom), early in the morning or late in the day when the sun won’t scorch the foliage.
Do this every 7–10 days as needed.
Important: This spray is preventative, not a cure-all. And test on a small area first. Some varieties are more sensitive than others.
For Slight pH Adjustment (If You’re After Pink Blooms)
If your hydrangeas are stubbornly blue and you’re dreaming of blush pink, a teeny sprinkle of baking soda might gently nudge your soil’s pH upward.
Here’s how:
- Sprinkle 1 tablespoon of baking soda around the base of the plant (not directly on the stem)
- Water it in thoroughly
- Repeat no more than once a month during the growing season
But listen, don’t overdo it. You’re not baking a cake. You’re managing soil chemistry.
A heavy hand can throw things off for not just the hydrangea, but everything else in that bed.
Also, test your soil first if you’re serious about pH adjustment. A cheap pH test kit ($10–$15 at garden centers or online) will save you a lot of guesswork and frustration.
What Not to Do With Baking Soda and Hydrangeas
- Don’t mix it into potting soil, it can mess with root development
- Don’t apply during peak heat or full sun, leaf burn is real
- Don’t assume more is better, you’ll get the opposite of what you want
Honestly, this isn’t one of those “set it and forget it” tricks. It’s more like seasoning food, you learn how much is enough based on how your plants react.
If you’re unsure, start with a foliar spray before touching the soil. It’s easier to monitor and adjust.
Does Baking Soda Boost Hydrangea Flowering? (Here’s the Truth)

Let’s cut to it, can baking soda make your hydrangeas bloom like crazy?
Short answer? Not really.
Longer answer? It’s complicated.
Baking soda doesn’t feed your plant. It’s not a bloom booster or a fertilizer.
So if you’re sprinkling it around and expecting sudden explosions of color, you’re probably setting yourself up for disappointment.
But, and this is a gentle but, it might help indirectly.
Here’s how.
Hydrangeas are moody. Their ability to flower hinges on a handful of critical factors:
- Enough sunlight
- Proper pruning
- Good soil nutrition
- Not-too-acidic, not-too-alkaline soil
- Healthy, fungus-free leaves
Baking soda can play a minor role in that last one. If your hydrangeas are dealing with mildew or leaf spot, they’re putting energy into survival, not blooming.
A healthy leaf equals a more productive plant.
So by using a baking soda spray to prevent fungal disease, you’re supporting a healthier, more capable shrub.
It’s kind of like giving your kid a multivitamin. It doesn’t make them a math genius overnight, but it supports everything else so they can learn better.
So while baking soda alone doesn’t trigger blooms the way a solid fertilizer might, it can help clear the path.
Now, if your hydrangea isn’t flowering at all? That’s usually a bigger story. And we’ll get into that next.
Recap Time: What Does Affects Blooming?
- Sunlight: most varieties need at least 4 hours of dappled or morning sun
- Pruning: Pruning at the wrong time = cutting off next year’s blooms
- Nutrition: A fertilizer with low nitrogen and high phosphorus is best for flowers
- Moisture: dry spells or waterlogged roots mess with bloom cycles
- Weather: A late spring frost can nip flower buds right off
Baking soda doesn’t make hydrangeas bloom, but it may help them get healthy enough to bloom.
If your plant is struggling, think of baking soda as a backup singer. Helpful, supportive, not the star of the show.
Hydrangea Not Flowering? Here’s What Could Be Going Wrong

Few things mess with a gardener’s heart like a hydrangea that just… refuses to bloom. You wait all spring. You feed it. You whisper encouragement.
And still, nothing. Just big green leaves staring back at you like, “What? You wanted flowers?”
If your hydrangea isn’t blooming, it’s not trying to be difficult; it’s reacting to something.
Let’s walk through the usual suspects.
1. You Pruned at the Wrong Time (It Happens A Lot)
This is one of the most common mistakes, especially with bigleaf (macrophylla) and oakleaf hydrangeas.
These types bloom on “old wood”, meaning stems that formed last summer.
If you prune them in early spring, thinking you’re being proactive, you’re actually chopping off the flower buds.
The fix?
Stop pruning in fall or spring. Instead, only prune right after the plant flowers (usually midsummer) if you need to shape it.
And honestly, many hydrangeas don’t need regular pruning at all, just deadheading.
If you’re growing varieties like ‘Endless Summer’ or panicle hydrangeas, they bloom on new wood, so they’re more forgiving.
Still, always check your type before cutting.
Not Enough Sunlight (Yes, Even Shade Lovers Need Light)
Hydrangeas love dappled light. But too much shade? No blooms.
A lot of us stick them under trees or along the north side of the house where the soil stays cool.
It seems like a good idea, until the flower buds never show up.
Most varieties, even the shade-tolerant ones, need at least 4 hours of morning sun to perform well.
Try relocating your plant or gently trimming back any overhanging branches that are blocking the sun. Think soft, filtered light, not deep woodland shadow.
Overfertilizing (Yes, That’s a Thing)
More fertilizer = more flowers, right? Not always.
Too much nitrogen leads to lush leaves and zero blooms. Your hydrangea will look like a tropical jungle, but it won’t flower.
The fix:
Use a balanced fertilizer or one with more phosphorus than nitrogen. Look for NPK ratios like 10-20-10 or 5-10-5 on the label.
And don’t feed more than once a month during the growing season.
If you’re using baking soda around your plants, be cautious; changing the soil pH too much can affect how your fertilizer performs.
4. Winter Damage (Especially in Zones with Surprise Frosts)
If your hydrangea sets buds in late summer and then gets hit with a freak cold snap in fall or spring, those buds may not survive.
This is super common in USDA zones 5 to 7, where the weather has no chill (pun intended).
The fix:
Mulch heavily around the base in late fall. In colder areas, wrap the plant in burlap or use a protective dome if frost is predicted.
Hydrangeas might be tough, but their buds are drama queens.
5. Drought Stress or Soggy Soil (Roots Matter More Than You Think)
Hydrangeas have shallow roots that hate extremes. If they dry out or stay soggy, they’ll focus all their energy on survival, not blooming.
Stick your finger in the soil, if it’s bone dry or swampy, you’ve got a drainage problem or watering issue.
Aim for consistently moist (but not wet) soil. And always check the base of the plant, not just the top inch.
Bonus Tip: Check Your Soil pH
Not flowering? It might not be the pH, but extreme acidity or alkalinity can mess with nutrient absorption.
A cheap soil test kit can help you figure out where you stand, and whether baking soda (or sulfur) might help rebalance things.
Still not seeing blooms even after trying baking soda? It might be something else entirely, like pruning at the wrong time or poor soil conditions.
Here are 7 reasons your hydrangeas might not be blooming (and how to fix each one before next season sneaks up).
How to Take Care of Hydrangeas (Simple, Real Advice That Works)


Hydrangeas have a bit of a diva reputation: finicky, moody, unpredictable. But once you understand what they need, they’re not that difficult.
In fact, they can be surprisingly low-maintenance, if you play by their rules.
And no, you don’t need a green thumb or a Master Gardener badge. Just some patience, a little observation, and maybe a weather app.
Let’s walk through the basics of Hydrangea Plant Care, no fluff, just what works.
Light: Not Too Much, Not Too Little
Hydrangeas thrive in morning sun and afternoon shade. That sweet spot of soft light gives them energy without frying their leaves.
Full sun can work for panicle hydrangeas (like ‘Limelight’), but others, like bigleaf and oakleaf, get crispy real quick under harsh rays.
Too much shade, though? You’ll get leaves but no blooms.
Pro tip: If your plant wilts every afternoon, even with watering, it’s probably getting too much sun.
Try some light shade cloth or reposition it if it’s in a pot.
Water: Think “Evenly Moist”
Hydrangeas don’t like extremes.
Too dry? They will be like toddlers after a skipped nap. Too wet? Root rot.
Aim for consistently moist soil, especially during their peak season (spring through early fall).
If you’re not sure, stick your finger into the soil. If the top 2 inches feel dry, it’s time to water.
Use mulch (about 2–3 inches thick) to keep moisture levels steady and protect roots from temperature swings.
Feeding: Less Is More
Here’s the deal: hydrangeas don’t need a buffet. Feed them once in early spring and again in late spring (if needed).
Go for a balanced fertilizer like 10-10-10, or one slightly higher in phosphorus if you want more blooms (look for something like 10-20-10).
And if your plant is already lush and leafy? Don’t overdo it, too much nitrogen = no flowers.
Pruning: Only If You Know Your Type
Some hydrangeas bloom on old wood (last year’s stems), while others bloom on new wood (this year’s growth).
This changes everything when it comes to pruning.
- Old wood bloomers: bigleaf, oakleaf, mountain hydrangeas
–Prune after they flower (mid to late summer) - New wood bloomers: panicle and smooth hydrangeas
–Prune in late winter or early spring
If you don’t know your type, don’t touch it until it flowers. Then you’ll know when to cut next year.
Winter Care: Protect Those Buds
Hydrangeas don’t love drama, and winter can be… dramatic.
If you’re in zones 5–7, give your plants some TLC before the deep freeze:
- Add mulch around the base (4–6 inches)
- Cover with burlap if a late frost is expected
- Avoid pruning after August
New growth is tender. Cold snaps in late spring can zap flower buds before they open.
Other Quick Tips That Actually Help:
- Rotate potted hydrangeas every few days so all sides get light
- Deadhead blooms regularly for a cleaner look and longer bloom cycle
- Keep an eye out for pests like aphids and spider mites, especially in dry weather
- If you’re planting in pots, choose a container at least 18 inches wide and make sure it drains well
- Give new hydrangeas a full growing season to settle in, they don’t love being rushed
How to Propagate Hydrangeas in Water (Yes, It Actually Works)
You know that feeling when you cut a bouquet of hydrangeas and one stem just starts sprouting roots on its own in the vase?
That’s not a fluke, it’s hydrangeas being generous.
They’re one of the few flowering shrubs that actually root in water, which makes them perfect for propagation at home.
You don’t need a greenhouse. You don’t even need rooting hormone (though it helps). Just a healthy plant, a clean cut, and a little patience.
Let me show you how to turn one hydrangea into many, without getting your hands too dirty.
Step 1: Pick the Right Stem (Timing Matters)
You want to do this in late spring or early summer, when the plant is actively growing but not stressed by heat.
Look for:
- A stem that hasn’t flowered yet (flowering stems are less likely to root)
- One that’s firm, green, and about 4–6 inches long
- A stem with at least 2–3 leaf nodes (those bumps where leaves grow out)
Cut the stem at a 45° angle just below a node using clean, sharp scissors or pruning shears.
Step 2: Strip & Trim
Now, gently remove the leaves from the bottom two nodes. Those bare nodes will be submerged and are where roots will grow.
Leave just a couple of leaves at the top, but trim them in half if they’re large.
This keeps the cutting from losing too much moisture while it roots.
Step 3: Place in Water (But Not Too Deep)
Grab a clear glass jar or cup, nothing fancy.
Fill it with room-temperature water and pop in the cutting. Make sure:
- Only the bottom nodes are submerged
- No leaves touch the water (they’ll rot)
Stick the jar on a bright windowsill with indirect sunlight. Change the water every 2–3 days to keep things clean and oxygenated.
Now Wait (The Hardest Part)
This part takes 2–3 weeks, sometimes a bit longer depending on temperature and light.
You’ll start seeing tiny white roots emerge from the nodes. Once the roots are an inch or two long, your baby hydrangea is ready to graduate to soil.
Step 4: Pot It Up
Plant the rooted cutting in a small container with well-draining potting mix.
Water it gently and keep it out of direct sunlight for the first few days while it adjusts.
Once you see new leaf growth, it’s officially rooted. Give it about 8–10 weeks in that pot before moving it into the ground or a bigger container.
Extra Tips for Success
- If you’re nervous, do a few cuttings at once. Not all of them will take, and that’s okay.
- Don’t panic if the leaves wilt early on. As long as the stem stays green, it’s still working.
- Avoid fertilizing until it’s rooted. Too much, too soon = root burn.
Why Propagate in Water?
Honestly? It’s easier. You can see what’s happening. There’s something hopeful about watching roots grow right there in your kitchen window.
Plus, it’s free, and kind of addicting once you get the hang of it.
Does Baking Soda Kill Weeds Around Hydrangeas? (And Should You Use It?)
Let’s be real: Weeds are relentless. You pull one, and five more pop up like they’re playing whack-a-mole.
If you’ve got a hydrangea bed and you’re not into chemical herbicides (understandably), you’ve probably heard whispers that baking soda might help.
But does it actually work, and more importantly, is it safe to use around your beloved hydrangeas?
Let’s unpack the good, the bad, and the maybe.
The Theory: Why Baking Soda Works on Weeds
Baking soda (sodium bicarbonate) is naturally high in salt, which disrupts the water balance in plant cells.
When sprinkled directly on leaves or poured into soil, it essentially dries out and shrivels unwanted growth, especially small, young weeds with delicate leaves.
And yes, it really does kill some weeds. But it’s not exactly a one-size-fits-all solution.
The Warning: Baking Soda Doesn’t Discriminate
Here’s the tricky part: Baking soda doesn’t just zap weeds, it can also harm your hydrangeas, their roots, and the soil biology if overused.
It’s kind of like using bleach to clean your counters, great for killing stuff, but not great if it touches your hands or gets on the cookies.
That said, with careful, targeted use, it can help with small patches of weeds away from your hydrangea’s root zone.
When (and How) to Use Baking Soda Around Hydrangeas
If you’re desperate to tackle a few invaders, here’s a safer approach:
Spot Treatment for Walkways or Edges:
- Wet the weed lightly with water first
- Sprinkle baking soda only on the leaves, not the soil
- Do this on a dry, sunny day for better absorption
- Avoid runoff, it can travel to nearby roots
Only use this method around pavers, paths, or edges near your hydrangea bed. Don’t use it directly in the bed.
Skip if:
- You have sandy or nutrient-poor soil
- Your hydrangea is showing signs of stress
- Weeds are too close to the plant’s crown or base
What About Using Baking Soda as a Weed Preventer?
That’s a no-go. It’s not a preventative, and using it too often will alter the pH of your soil, something hydrangeas are super sensitive to.
If you’re not careful, you could unintentionally affect the color of your blooms (more on that in the next section) or slow down nutrient uptake.
Better Weed Control Options for Hydrangea Beds
If you’re worried about weed overgrowth near your shrubs, here’s what works better:
- Mulch, mulch, mulch: Apply 2–3 inches of bark mulch or shredded leaves around your hydrangeas. It blocks sunlight and smothers most weeds.
- Hand pulling while the soil is moist: The Easiest way to get full roots out without disturbing your plant.
- Boiling water on the weeds (not near roots): Cheap, effective, and chemical-free.
- Vinegar + dish soap spray: Works on sunny days for small weed patches, just don’t spray near hydrangea leaves or stems.
Can Baking Soda Cure Fungal Problems on Hydrangeas?
Short answer? Sometimes. But don’t count on it as a magic cure.
Baking soda can help prevent fungal diseases like powdery mildew or leaf spot from spreading, especially when used early.
It works by making the leaf surface less friendly for fungus, kind of like making your front porch too slippery for pests to land.
But here’s the thing: it’s more of a barrier than a cure.
If your hydrangea is already heavily infected, baking soda won’t reverse the damage.
DIY Anti-Fungal Spray Recipe:
- 1 tablespoon baking soda
- 1 teaspoon mild liquid soap (like Castile)
- 1 gallon of water
Mix and spray lightly on leaves once a week during damp, humid weather. Always test a small patch first; too much can scorch tender leaves.
Quick Tip:
If you’re constantly battling fungus, it might be a moisture issue, bad airflow, overcrowded beds, or overhead watering that can create the perfect storm.
Final Thoughts: A Little Baking Soda, A Lot of Bloom
Who knew a simple box of baking soda could stir up this much curiosity in the garden? From brightening blooms to battling fungus, it’s no miracle cure, but it can be a useful sidekick when used with care.
Hydrangeas aren’t delicate prima donnas. They’re forgiving, bold, and endlessly satisfying to grow, whether you’re chasing blue flowers or just trying to keep the weeds out of their space.
So next time you’re elbow-deep in mulch, coffee in one hand and pruners in the other, remember: it doesn’t take fancy solutions to grow something beautiful.
Sometimes, it just takes knowing when to sprinkle, when to step back, and when to let nature handle the rest.